Showing posts with label Nail art. Show all posts
Showing posts with label Nail art. Show all posts
Wednesday, December 23, 2015
Guess What! New China Glaze Nail Stripers Are Coming!
Hello there friends,
I'm so excited about the new nail art stripers by China Glaze. For all you nail art enthusiasts out there, you should be excited too. I can't wait to see how these babies perform. For someone who can't draw a straight line with a ruler, I have high expectations for these stripers. Probably too high. Let's face it, I still won't be able to paint tiny Piccasos on my nails. But maybe these stripers will get me just a bit closer to getting the courage to try.
The selection of colors is wide: yellow, red, silver, green, orange, gold blue, pink, purple, white, black...ok, let's just say they've covered all the basics. Of course, these stripers will be available at Sallys Beauty. We love Sally's don't we? Nod your head.
Can't wait to check them out. If you grab some before I do, let me know if you're painting tiny Monets on your nails.
Ciao for now.
Posted by
Paints And Polish
at
7:42 PM
No comments:


Email ThisBlogThis!Share to TwitterShare to FacebookShare to Pinterest
Links to this post
Labels:
#paintsandpolish,
China Glaze,
Nail art,
stripers
| Reactions: |
Sunday, August 2, 2015
Zoya Week Sunday: Meet Edyta and Neely
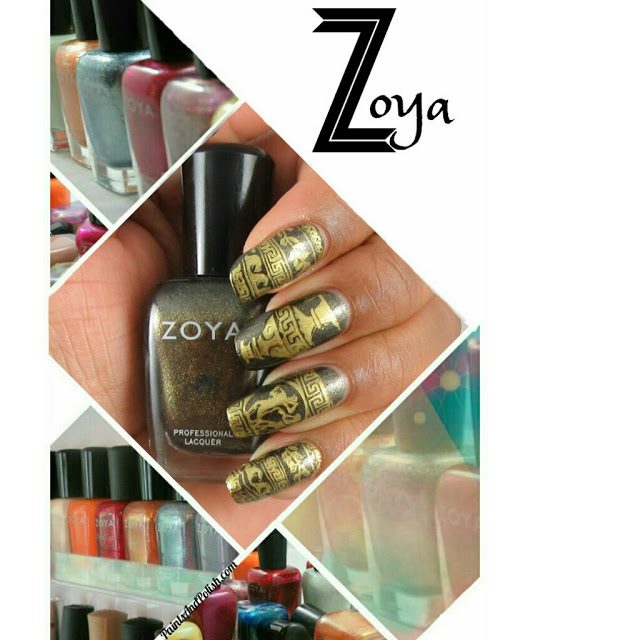
Although I have more Zoya polishes to share with you, we've come to the end of our week long Zoya journey. These last two ladies are in direct contrast with one another. Edyta is a black/gold micro glitter while Neely is a pastel green creme.
 |
| Edyta |
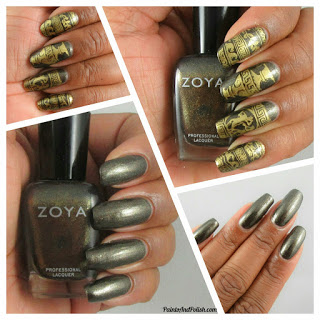
Edyta is a black/gold shimmer polish that appears glittery in the bottle, but is more of a shimmer once applied. I used gold Mundo De Unas stamping polish with a MoYou London plate from the Explorer set. The Greco Roman theme worked great with this black/gold polish.
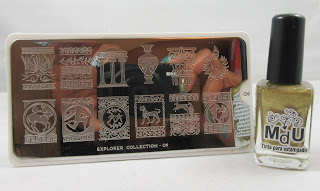 |
| Mundo De Unas Gold 17 and MoYou London Explorer Collection - 09 |
 |
| Neely |
I have two Neely polishes. Once again, I unintentionally repurchased a polish. Maybe I could avoid this if I make a list of the polishes I have and carry it with me. Not likely, but it's a good idea.
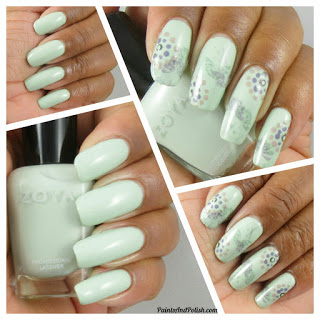
This polish is such a soft color that I wanted to add a soft design to it. I stamped a simple floral design and used a dotting tool to create multi-colored circles. Soft and simple.
What are your favorite Zoya polishes?
Sunday, July 19, 2015
Bowling....Not a Great Idea For Nails
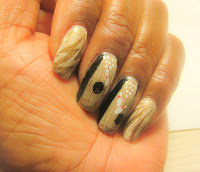
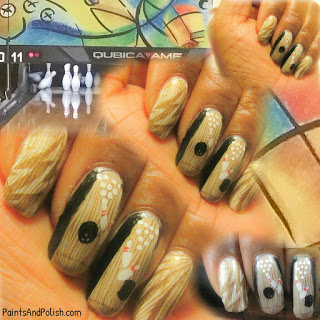
"Aww, Come on, really!?" This is what I said over an over again yesterday when we went bowling. I was so upset about all the repair work I would have to do to my nails that I was distracted from the game....right...that was the reason for my low scores. Not because I'm a poor bowler.
This was my diary entry for today.
Clearly, bowling isn't my forte'. I'll never be a professional bowler, nor will anybody invite me to be in their league. Nope, not gonna happen.
I took the kids and parents bowling yesterday. I figured that my teen would beat us all, then I would come in second followed by my 11 year old and then my parents. I was sooo sure I would come in second, at least third, but I was sooo wrong. I didn't beat anybody. I had the lowest score through two games. I didn't even redeem myself in the second game. No, my bowling got worse and worse as nail after nail chipped cracked peeled and broke. I did a lot of repair work when I got home and then got an inspiration for this manicure.
Do you bowl, or do you avoid it like I'm going to do? How do you keep your nails healthy when you bowl?
Saturday, July 18, 2015
O.P.I. Paints review
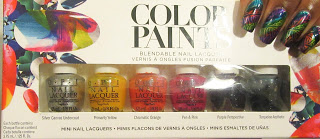 It seems that everyone is jumping on the blendable nail polish band wagon. First, O.P.I. came out with their Color Paints collection, then Sephora with Formula X Infinite Ombre limited edition set. Now, Morgan Taylor has Laquer Chrome Collection. What's next, China Glaze Silver Chromatic Backdrop Collection?
What's similar about these sets? They're all two-step processes that start with a silver color base coat followed by one or more sheer polishes.
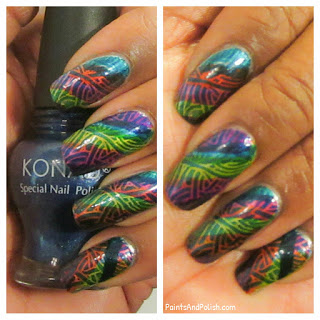
I purchased a mini set of O.P.I. Color Paints because I'm not so excited about the polishes. I didn't want to commit to full size bottles. The concept is nice, but I didn't look forward to testing them out. But, test them I did, because I wanted to give you guys, my wonderful readers, a bit of information about them. The O.P.I. Color Paints set has a silver base color called Silver Canvas Undercoat. Then there are 5 color polishes-- Primarily Yellow, Chromatic Orange, Pen & Pink, Purple Perspective and Turquoise Aesthetic (what, no Green Screen?).
It started off simple enough. The silver applied smoothly, and looked nice enough to wear on its own. Then I continued to make two failed attempts at creating colorful designs before I was satisfied with a wearable manicure. I would like to show you the fails....no, I really don't want to show the fails. As a matter of fact, I didn't bother to take a picture of the second one. But I can reveal my final attempt. I was satisfied only after I stamped over the polishes with Konad Blue Pearl (I think that's the name).
Unfortunately, I'll have to work with the multi-colored paint over chrome design concept one more time. I accidentally purchased the Sephora Formula X Infinite Ombre set. I placed a ridiculously low bid on EBay assuming that I wouldn't win, and by fluke, I won the bid. So to be fair, I have to review it as well. However, after Formula X I'm done with the base chrome concept and Morgan Taylors Chrome Collection won't be crossing my threshold. Sorry Morgan.
Posted by
Paints And Polish
at
8:00 AM
No comments:


Email ThisBlogThis!Share to TwitterShare to FacebookShare to Pinterest
Links to this post
Labels:
blendable,
collection,
Color Paints,
Formula X,
Gradient,
jelly,
mini,
Morgan Taylor,
Nail art,
O.P.I.,
ombre,
orange,
paint,
Pink,
polish,
purple,
review,
Sephora,
Turquoise,
water
| Reactions: |
Thursday, July 16, 2015
Happy Birthday...not
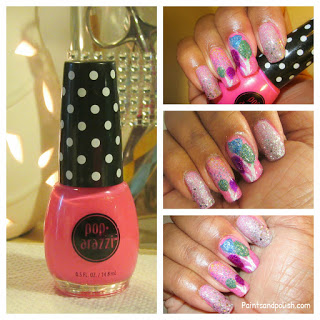
Yesterday my teen played a mean joke on his brother. He told little bro that it was my birthday. My birthday is actually this month, so he had no reason to dispute his brother. I felt terrible telling him that it wasn't my birthday. In hindsight maybe I should have gone along with it. He walked, by himself, to CVS and bought his mommy a card and gift. How special is that! He insisted that I open my gift right away even though it wasn't my birthday, and I swear he's the sweetest, most thoughtful son on the planet. He spent his allowance on a bottle of pink nail polish. Go ahead, say it. Awwwwwww.
Of course I had to show my appreciation, so I laboriously removed my fresh, (just painted to perfection), manicure to come up with something using my brand new bottle of polish.
Of course I had to show my appreciation, so I laboriously removed my fresh, (just painted to perfection), manicure to come up with something using my brand new bottle of polish.
The polish is 'Fuschia in Show Biz' by Pop-arazzi. I used stamping polish by Konad and BMC. My manicure wouldn't be complete without a top coat of Revlon's 'Holographic Pearl' and a touch of L.A. Colors glitter polish.
How do you like my baloons?
Posted by
Paints And Polish
at
10:08 AM
No comments:


Email ThisBlogThis!Share to TwitterShare to FacebookShare to Pinterest
Links to this post
Labels:
#paintsandpolish,
Birthday,
holographic,
Manicure,
Nail art,
Pink,
polish,
Tutorial
| Reactions: |
Tuesday, July 14, 2015
Seaweed and Jellyfish
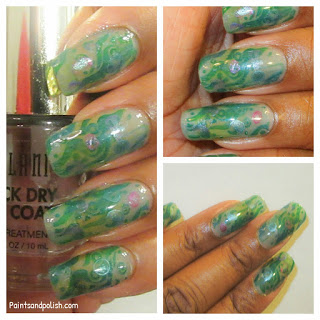
I still have my trip to the aquarium on my mind. In my last Dear Diary post I mentioned jellyfish. I fit a few multi colored "jellyfish" into this seaweed mani.
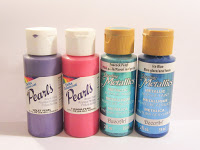
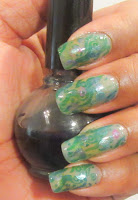
I stamped the seaweed image directly onto my clear base coat with a blend of blue and green stamping polish ('Konad Green' and 'Wavelength' by BMC). Then I used a few watered down pearl and metallic acrylic paints for the jellyfish.
I didn't use the Milani quick dry top coat in the top picture. I needed this manicure to shine and with the exception of clear gel polish, Seche Vite is the shiniest fast drying top coat on the market, imo. Obviously, Seche Vite is my all-time favorite top coat.
There you have it. A seaweed and jellyfish manicure. Ok, that's it for the aquarium inspired manicures. I'm moving on now.
I stamped the seaweed image directly onto my clear base coat with a blend of blue and green stamping polish ('Konad Green' and 'Wavelength' by BMC). Then I used a few watered down pearl and metallic acrylic paints for the jellyfish.
 |
| Blue Jelly polish |
The stamping plate I used was an old plate I found on EBay a few years ago. It was plate "M" if that helps any. After stamping on the seaweed and painting on the "jellyfish", I coated my nails with a light wash of blue jelly polish that I blended myself.
|
There you have it. A seaweed and jellyfish manicure. Ok, that's it for the aquarium inspired manicures. I'm moving on now.
Posted by
Paints And Polish
at
4:07 AM
No comments:


Email ThisBlogThis!Share to TwitterShare to FacebookShare to Pinterest
Links to this post
Labels:
#paintsandpolish,
acrylic paint,
jellyfish,
Manicure,
metallic,
Nail art,
Ocean,
purple,
seaweed,
stamping,
swatch,
Tutorial,
water
| Reactions: |
Saturday, July 11, 2015
Dear Diary -- July 10: A trip to the aquarium
Dear Diary,
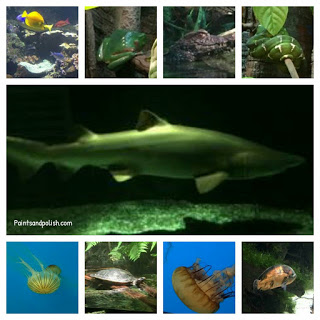
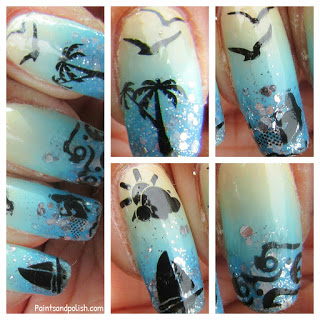
Mom and Dad were in town for the holiday weekend and we took the boys to the National Aquarium at the Baltimore Harbor. We had a great time. I wanted to take lots of pictures, but soon after we arrived my phone died. I had forgotten my camera and I didn't have a charger so I had to rely on my resident teen photographer. I think he did a great job. I didn't have to edit a thing.His superb photography work inspired me to do a seaside manicure. I used a few China Glaze polishes for my gradient, and a Sally Hansen Triple Shine glitter polish for a little sparkle.
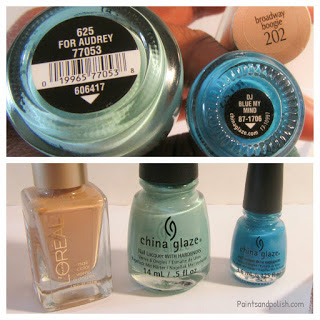 |
| For Audrey and DJ Blue My Mind by China Glaze Broadway Boogie by Loreal |
I couldn't resist a mermaid, sail boat and palm trees.
Now I have Jelly fish on the brain. Hmmmm.....
Posted by
Paints And Polish
at
10:29 AM
No comments:


Email ThisBlogThis!Share to TwitterShare to FacebookShare to Pinterest
Links to this post
Labels:
#paintsandpolish,
blue,
fish,
Gradient,
Manicure,
Nail art,
Ocean,
polish,
Revlon,
swatch,
water
| Reactions: |
Thursday, July 9, 2015
Revlon's Gold Glaze
Yesterday I promised you a few swatches of 'Gold Glaze', a sister polish to Revlon's 'Pink Glaze' and 'Holo Pearl'.
Once again, I wasn't disappointed. I used both white and black base coats to get an idea of how the top coat effect layers over both dark and light colors.
After several coats (about four), I got a sheer gold shimmer over white polish. But after just two coats 'Gold Glaze' transformed into a beautiful metallic gold over black polish. I have metallic gold polishes that aren't as appealing as this combo. Two thumbs up for Revlon's 'Pink Glaze', 'Gold Glaze' and 'Holo Pearl' polishes.
| Pink Glaze Holo Pearl Gold Glaze |
After several coats (about four), I got a sheer gold shimmer over white polish. But after just two coats 'Gold Glaze' transformed into a beautiful metallic gold over black polish. I have metallic gold polishes that aren't as appealing as this combo. Two thumbs up for Revlon's 'Pink Glaze', 'Gold Glaze' and 'Holo Pearl' polishes.
Posted by
Paints And Polish
at
3:47 PM
No comments:


Email ThisBlogThis!Share to TwitterShare to FacebookShare to Pinterest
Links to this post
| Reactions: |
Wednesday, July 8, 2015
Revlon's Pink Glaze Nail Polish
I can't remember the last time I visited a Rite Aid, so when I drove by one today, I had to turn around and take a look around. After promising the kids that I'd be right back (that really means pull out your video game devices and have a good time). I planned to do a little personal comparison to my local CVS and Wallgreens. My plan was to look around, not shop, but when I found two sister polishes to my Revlon Holo Pearl, I couldn't pass them up. Revlon's top coat effects 'Pink Glaze' and 'Gold Glaze'.
I was so impressed with Revlon's 'Holo Pearl' that I couldn't resist the other two. I didn't expect them to live up to the same standard as the 'Holo Pearl', however, simply because they are not holographic polishes. They looked great in the bottle, though, and I do have a new found respect for Revlon, so it was definitely worth a try.
I was so impressed with Revlon's 'Holo Pearl' that I couldn't resist the other two. I didn't expect them to live up to the same standard as the 'Holo Pearl', however, simply because they are not holographic polishes. They looked great in the bottle, though, and I do have a new found respect for Revlon, so it was definitely worth a try.
| Pink Glaze Holo Pearl Gold Glaze |
I painted both top coat effects over white and black polish to see how they would look over dark and light colors. I was surprised to see that the Pink Glaze showed up as a faint pinkish shimmer over white polish, but a vibrant purple iridescent color over the black polish. 'Pink Glaze' over white polish was barely noticeable, but it was absolutely stunning over black polish. Quite impressive.
Tomorrow we'll take a look at Revlon's 'Gold Glaze'.
Ciao for now.
After a bit of stamping
Tomorrow we'll take a look at Revlon's 'Gold Glaze'.
Ciao for now.
Posted by
Paints And Polish
at
12:12 PM
No comments:


Email ThisBlogThis!Share to TwitterShare to FacebookShare to Pinterest
Links to this post
Labels:
#paintsandpolish,
holo,
holographic,
Manicure,
metallic,
Nail art,
polish,
purple,
Revlon,
swatch
| Reactions: |
Tuesday, July 7, 2015
Revlon's Holo Pearl
I happened upon a beautiful find at CVS. Revlon Holo Pearl, a holographic top coat. Since I've recently caught the holographic micro glitter, bug I had to try this one. My experience is that not all holographics are the same. But, I was satisfied and quite impressed with this one. No, I didn't see the rainbow, but the glittery effect is outstanding. It twinkles like a million tiny diamonds.
Unfortunately, I have to give this disclaimer first. The following pictures do not give justice to this polish. The beautiful, holographic, glittery effects are noticeable. But believe me when I say this....Trust me it's fantastic!
Unfortunately, I have to give this disclaimer first. The following pictures do not give justice to this polish. The beautiful, holographic, glittery effects are noticeable. But believe me when I say this....Trust me it's fantastic!
Posted by
Paints And Polish
at
9:06 AM
No comments:


Email ThisBlogThis!Share to TwitterShare to FacebookShare to Pinterest
Links to this post
Labels:
#paintsandpolish,
holo,
holographic,
Manicure,
metallic,
Nail art,
polish,
Revlon,
swatch
| Reactions: |
Friday, July 3, 2015
Blue and purple peacock manicure
I recently purchased a set of Kleancolor polishes and was anxious to try them out.
The set included six metallic polishes and six holographic polishes. This was my first experience with the Kleancolor brand and I was reluctant. For $14.68 (EBay) I got 12 polishes which amounts to $1.22 per bottle! Honestly, my expectations were pretty low because of the price.
The six metallic colors in the set were vibrant. The polish was a good consistency and they applied smoothly and evenly, without streaking. I wasn't quite as impressed with the holographic set, but the metallics were great.
Metallic set
| Holographic set |
Right away I wanted to try the metallic polishes, so I did a simple gradient manicure to test them out.
For this manicure I used 5 polishes.
| 'Metallic Aqua', 'Metallic Fuschia', 'Bubbly Bombshell', ' Twinkle', and 'There's No Place Like Chrome' |
After my base coat, I applied a single coat of Kleancolor's 'Metallic Aqua' (the blue one on the left) and allowed it to dry. I was satisfied with the single coat because I would be sponging a few coats over it. Otherwise, the formula for the metallic polishes is completely opaque in two coats. With a cosmetic wedge, I created the gradient effect using 'Metallic Aqua' and 'Metallic Fuschia' (the purple one). If you would like a detailed tutorial on how to do a gradient manicure please leave me a comment and I will demonstrate the technique.
Once I was satisfied with the results, I used two glitter polishes to give the manicure a little pizzazz. I'm addicted to anything that sparkles. I dabbed on the glitters similarly to how I did the polishes. The purple glitter is 'Bubbly Bombshell' by OPI and the blue one, which has flecks of purple throughout, was 'Twinkle' by Milani. I believe the Milani polish is an old formula and you may have a hard time finding it. If you like it, I would suggest you try EBay.
Finally, I used Born Pretty stamping plate BP-04 to stamp a peacock using Essie's 'There's no Place Like Chrome' polish, which is a good silver stamping polish by the way.
| Porn Pretty plate BP-04 |
Have you tried polishes by Kleancolor? What are your experiences with the brand? Leave me a comment below.
Posted by
Paints And Polish
at
8:40 AM
No comments:


Email ThisBlogThis!Share to TwitterShare to FacebookShare to Pinterest
Links to this post
| Reactions: |
Wednesday, July 1, 2015
4th of July Nail Art
Welcome, readers! I'm so excited to start my blog. And what better time to start than just in time for the holiday. I decided to publish my first post just prior to the 4th of July holiday so that you have a chance to try out a couple of patriotic designs. I'm going to show you 3 manicures today. One for the artistically inclined, and the other 2 for the artistically challenged (that would be me). If you haven't done so already, please check out my Profile page to get to know a little about me.
Before I jump into the fun part, I want to thank you for taking an interest in my blog. For more than a year now I've been totally engrossed in nail polish and makeup. I can't get enough. Finally, when I realized how much time, money and effort I put into trying out tutorials and shopping for the perfect polishes, eye shadows and lipsticks it was too late for me to slow down. I was obsessed. When I filled my first 3 acrylic nail polish racks (the ones in the salons that hold about 100 bottles), I knew I had a problem and the only way to justify it was to share my polishes with friends and family. But seriously, who was I kidding? I couldn't give up my China Glaze or my O.P.I. God forbid if somebody touched my Zoyas. And as hard as I tried to let go of my drugstore Sally Hansen's, I just couldn't do it. There is no such thing as an ugly polish or a color that I can't work with. I couldn't even part with the polishes that I have in duplicate (yes, I accidentally buy polishes that I already have). So, since it was clear my hoarding wasn't going to stop and that I was unwilling to share, then I figured that I can share my knowledge and enthusiasm online and help others to become obsessed hoarders just like me. If my kids think that Ulta is "that evil place that Mommy won't leave even when we beg", then yours should too. Why should I be in this alone? Being alone isn't healthy. So I encourage you to leave comments and email me at paintsANDpolishATgmailDOTcom so that we can keep an ongoing dialogue about our favorite polishes and which ones we can't live without. I'm looking forward to hearing from you.
Ok, Let's get started.
Next, paint over the tape and white polish with red. It's best to remove the tape before it has a chance to dry, otherwise you risk pulling up the polish. Warning: You can easily ruin your mancure by not letting it dry completely during this next step. If you don't heed this warning, I take no responsability for your not-so-patriotic red, pink and blue manicure. Even when you're certin that they're dry, some of the red may bleed into the white, so be careful when you apply a clear top coat. I use a good fast drying top coat. Seche Vite is my number one go-to quick drying top coat, and I wholeheartedly recommend it. Not only does it dry in record time, but shines like glass.
Before I jump into the fun part, I want to thank you for taking an interest in my blog. For more than a year now I've been totally engrossed in nail polish and makeup. I can't get enough. Finally, when I realized how much time, money and effort I put into trying out tutorials and shopping for the perfect polishes, eye shadows and lipsticks it was too late for me to slow down. I was obsessed. When I filled my first 3 acrylic nail polish racks (the ones in the salons that hold about 100 bottles), I knew I had a problem and the only way to justify it was to share my polishes with friends and family. But seriously, who was I kidding? I couldn't give up my China Glaze or my O.P.I. God forbid if somebody touched my Zoyas. And as hard as I tried to let go of my drugstore Sally Hansen's, I just couldn't do it. There is no such thing as an ugly polish or a color that I can't work with. I couldn't even part with the polishes that I have in duplicate (yes, I accidentally buy polishes that I already have). So, since it was clear my hoarding wasn't going to stop and that I was unwilling to share, then I figured that I can share my knowledge and enthusiasm online and help others to become obsessed hoarders just like me. If my kids think that Ulta is "that evil place that Mommy won't leave even when we beg", then yours should too. Why should I be in this alone? Being alone isn't healthy. So I encourage you to leave comments and email me at paintsANDpolishATgmailDOTcom so that we can keep an ongoing dialogue about our favorite polishes and which ones we can't live without. I'm looking forward to hearing from you.
Ok, Let's get started.
I love the American flag, but you dont have to wave one with this first manicure. Let your hands be the flag. You will need a true red polish, white polish and a royal blue. I used Cover Girl's "Lasting Red", "Navy Narcissist" by Maybelline Color Show, and "Snow Me White" by Sinful Colors. You will also need striping tape.
First painted all your nails white. Once completely dry,
add striping tape to each one in horizontal lines.
Next, paint over the tape and white polish with red. It's best to remove the tape before it has a chance to dry, otherwise you risk pulling up the polish. Warning: You can easily ruin your mancure by not letting it dry completely during this next step. If you don't heed this warning, I take no responsability for your not-so-patriotic red, pink and blue manicure. Even when you're certin that they're dry, some of the red may bleed into the white, so be careful when you apply a clear top coat. I use a good fast drying top coat. Seche Vite is my number one go-to quick drying top coat, and I wholeheartedly recommend it. Not only does it dry in record time, but shines like glass.
This is a good time to have your teen start diner, wash dishes or put in a load of laundry. Your nails are wet, oh darn, mom could use a helping hand.
Now we have the stripes, but we're still missing the stars. Use striping tape to tape off your first and middle fingers. On the middle finger after you place the horizontal tape, place a verticle one about halfway down the center of the nail creating a box for your blue polish. Now paint inside the lines with blue, just like you did in kindergarten. Once dry, use a dotting tool to place rows of stars over the blue background. Add your favorite top coat and wave your flags.
Now we have the stripes, but we're still missing the stars. Use striping tape to tape off your first and middle fingers. On the middle finger after you place the horizontal tape, place a verticle one about halfway down the center of the nail creating a box for your blue polish. Now paint inside the lines with blue, just like you did in kindergarten. Once dry, use a dotting tool to place rows of stars over the blue background. Add your favorite top coat and wave your flags.
On to the second manicure. Paint your pinky fingers red, first fingers blue and your ring fingers, middle fingers and thumb white. Once dry, use striping tape to make 2 vertical lines down the nails of your middle fingers so that you have 3 relatively equal sections. The section next to your ring fingers paint red, the section closest to your first finger, blue. Now your middle fingers are red, white and blue. Remove the tape before it starts to dry.
You can add red, white (silver), and blue glitter if you like. Don't forget your final top coat.
I saved the easiest for last. Polish your pinkys blue, first fingers red, and middle two fingers and thumb white. Apply striping tape vertically down the middle of your two middle fingers and paint the outter edges the same color as their adjacent fingers. If you have a steady hand or just simply don't want to use striping tape, you can freehand it. Don't forget your top coat. Now you're all ready to go out there and watch the fireworks.
I saved the easiest for last. Polish your pinkys blue, first fingers red, and middle two fingers and thumb white. Apply striping tape vertically down the middle of your two middle fingers and paint the outter edges the same color as their adjacent fingers. If you have a steady hand or just simply don't want to use striping tape, you can freehand it. Don't forget your top coat. Now you're all ready to go out there and watch the fireworks.
Posted by
Paints And Polish
at
8:00 AM
No comments:


Email ThisBlogThis!Share to TwitterShare to FacebookShare to Pinterest
Links to this post
Labels:
#paintsandpolish,
4th of July,
Manicure,
Nail art
| Reactions: |
Subscribe to:
Posts (Atom)
