Showing posts with label Tutorial. Show all posts

Tuesday, May 3, 2016

Sammy, What Happened?! -- A Marble Tutorial Recreation


Hi friends,
Recently, I watched a video tutorial by Sammy at The Nailasaurus.  In her video, Sammy recreated a beautiful marble effect manicure. She did a fantastic job using her own method. The tutorial was simple, and she made it look so easy to do. Sooooo, why couldn't I do it?!? Ok, in all honesty, I have a hard time following instructions. I always want to go off the beaten path.  For this reason I can't do simple things like cook, since it requires you to follow a recipe or at least repeat what you did the last time. For me, most wins are a one time only, because I don't follow instructions.

I need to work on that...

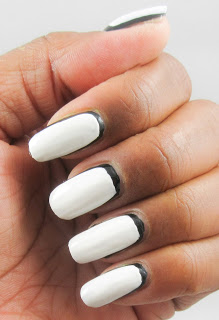
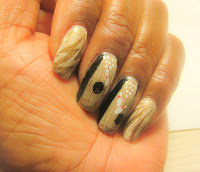
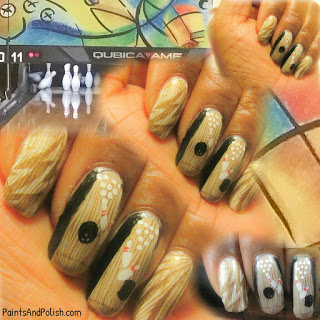
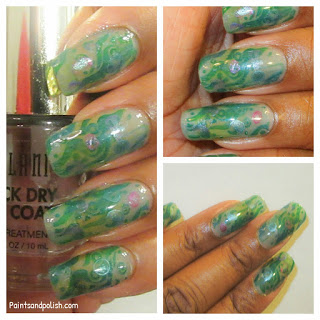
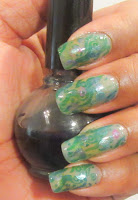
Anyway, although I didn't recreate Sammy's look, I did come up with my own (probably one time only) marble look mani. I think it turned out pretty nice, but when I attempted to do the other hand, my one time only thing kicked in and it turned out a complete mess. No photo of that. I don't want to destroy my reputation and have you guys thinking I need to go back to kindergarten (I'm still searching for kindergarten art classes for adults. If you hear of one in the DC area, let me know.)

I think I'll give this marble thing another try...one day.
Now, I'm going to go find another tutorial to ruin.
Ciao bellas!


Saturday, August 8, 2015

Inspired By...Onesies?


I've had my eye on these adorable little onesies for a long time, but I never had a reason to buy them until a couple of friends had twin baby girls.  I was so happy to find out that the twins were going to be girls because the couple already has two boys. Secretly I thought, "Finally! I get to buy those cute onsesies!"  I rushed out immediately to buy them and right away inspiration hit me.

Perfect manicure opportunity!

I pulled out white and black polishes and hunted through my stash of stamping plates for a design similar to the pattern on the onesies.

I started with a black background using SinfulColors Black On Black to create a black trim like on the onesies.    Then, using China Glazes White On White I filled in the middle part of the nail. Hmm, Black On Black and White On White...cute names perfectly coordinated for this manicure  Do you think China Glaze and SinfulColors got together and decided to collaborate on the names?  Probably not, but still it's cute.


I trimmed the nail edge with black and stamped the design using Konad Black and a GoGo Only stamping plate I found on EBay.


This is how it turned out


I hope you like it.
Do you have a favorite pattern you want to see in a nail art?  If you do, send me a photo and I'll see what I come up with.
Ciao for now.

Sunday, July 19, 2015

Bowling....Not a Great Idea For Nails


"Aww, Come on, really!?"  This is what I said over an over again yesterday when we went bowling.  I was so upset about all the repair work I would have to do to my nails that I was distracted from the game....right...that was the reason for my low scores. Not because I'm a poor bowler.  


This was my diary entry for today.


Dear Diary,

Clearly, bowling isn't my forte'.  I'll never be a professional bowler, nor will anybody invite me to be in their league.  Nope, not gonna happen.

I took the kids and parents bowling yesterday.  I figured that my teen would beat us all, then I would come in second followed by my 11 year old and then my parents.  I was sooo sure I would come in second, at least third, but I was sooo wrong.  I didn't beat anybody.  I had the lowest score through two games.  I didn't even redeem myself in the second game.  No, my bowling got worse and worse as nail after nail chipped cracked peeled and broke.  I did a lot of repair work when I got home and then got an inspiration for this manicure.


Do you bowl, or do you avoid it like I'm going to do?  How do you keep your nails healthy when you bowl?

Thursday, July 16, 2015

Happy Birthday...not


Yesterday my teen played a mean joke on his brother.  He told little bro that it was my birthday.  My birthday is actually this month, so he had no reason to dispute his brother.  I felt terrible telling him that it wasn't my birthday.  In hindsight maybe I should have gone along with it.  He walked, by himself, to CVS and bought his mommy a card and gift.  How special is that!  He insisted that I open my gift right away even though it wasn't my birthday, and I swear he's the sweetest, most thoughtful son on the planet.  He spent his allowance on a bottle of pink nail polish. Go ahead, say it.  Awwwwwww.

Of course I had to show my appreciation, so I laboriously removed my fresh, (just painted to perfection), manicure to come up with something using my brand new bottle of polish. 


The polish is 'Fuschia in Show Biz' by Pop-arazzi.  I used stamping polish by Konad and BMC.   My manicure wouldn't be complete without a top coat of Revlon's 'Holographic Pearl' and a touch of L.A. Colors glitter polish.
How do you like my baloons?

Tuesday, July 14, 2015

Seaweed and Jellyfish

I still have my trip to the aquarium on my mind.  In my last Dear Diary post I mentioned jellyfish.  I fit a few multi colored "jellyfish" into this seaweed mani.


I stamped the seaweed image directly onto my clear base coat with a blend of blue and green stamping polish ('Konad Green' and 'Wavelength' by BMC).  Then I used a few watered down pearl and metallic acrylic paints for the jellyfish.


Blue Jelly polish
The stamping plate I used was an old plate I found on EBay a few years ago.  It was plate "M" if that helps any.  After stamping on the seaweed and painting on the "jellyfish", I coated my nails with a light wash of blue jelly polish that I blended myself.


I didn't use the Milani quick dry top coat in the top picture.  I needed this manicure to shine and with the exception of clear gel polish, Seche Vite is the shiniest fast drying top coat on the market, imo.  Obviously, Seche Vite is my all-time favorite top coat.

There you have it.  A seaweed and jellyfish manicure.  Ok, that's it for the aquarium inspired manicures.  I'm moving on now.

Friday, July 3, 2015

Blue and purple peacock manicure


I recently purchased a set of Kleancolor polishes and was anxious to try them out. 
The set included six metallic polishes and six holographic polishes.  This was my first experience with the Kleancolor brand and I was reluctant.  For $14.68 (EBay) I got 12 polishes which amounts to $1.22 per bottle!  Honestly, my expectations were pretty low because of the price.

The six metallic colors in the set were vibrant.  The polish was a good consistency and they applied smoothly and evenly, without streaking.  I wasn't quite as impressed with the holographic set, but the metallics were great.

Metallic set


Holographic set

Right away I wanted to try the metallic polishes, so I did a simple gradient manicure to test them out.

For this manicure I used 5 polishes. 

'Metallic Aqua', 'Metallic Fuschia', 'Bubbly Bombshell', '
Twinkle', and 'There's No Place Like Chrome'

After my base coat, I applied a single coat of Kleancolor's 'Metallic Aqua' (the blue one on the left) and allowed it to dry.  I was satisfied with the single coat because I would be sponging a few coats over it. Otherwise, the formula for the metallic polishes is completely opaque in two coats.  With a cosmetic wedge, I created the gradient effect using 'Metallic Aqua' and 'Metallic Fuschia' (the purple one).  If you would like a detailed tutorial on how to do a gradient manicure please leave me a comment and I will demonstrate the technique.
Once I was satisfied with the results, I used two glitter polishes to give the manicure a little pizzazz.  I'm addicted to anything that sparkles.  I dabbed on the glitters similarly to how I did the polishes.  The purple glitter is 'Bubbly Bombshell' by OPI and the blue one, which has flecks of purple throughout, was 'Twinkle' by Milani.  I believe the Milani polish is an old formula and you may have a hard time finding it.  If you like it, I would suggest you try EBay.

Finally, I used Born Pretty stamping plate BP-04 to stamp a peacock using Essie's 'There's no Place Like Chrome' polish, which is a good silver stamping polish by the way.

Porn Pretty plate BP-04


Have you tried polishes by Kleancolor?  What are your experiences with the brand? Leave me a comment below.